User Defined Points
You may create your own points to be used in charts and some reports - these points you create are called User Defined Points, UDPs for short. The process of creating your own points involves creating new points, or choosing specific pre-supplied points, within a range of different point types provided by Solar Fire for this purpose. The Point Types are:
•Point
•Midpoint
•Fixed Position
•Fix Star
•Arabic Part
•Asteroid
•Extra Body
•Prior Lunar Phase
•Prior Eclipse
•Node
You can randomly create or choose points from some or all of the Point Types, to create a custom selection of additional points for use in a chart and also in some reports (Dynamic Reports, Graphic Ephemeris). This gives you the ability to curate a great amount of additional information, beyond what is supplied as standard, to be calculated and made available by Solar Fire. Each selection (i.e. list) of UDPs that you create is saved to a file, so you can easily re-apply that selection at any time, plus this means you can have as many different selections of UPDs as you like, using each one for a specific purpose in your charting.
>> To create or edit a customized selection of User Defined Points
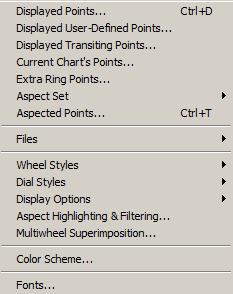
a)In the Main Screen click on Chart Options, or in the "View Chart" window right-click on any blank area, and the following menu will be displayed:
 Chart Options menu |
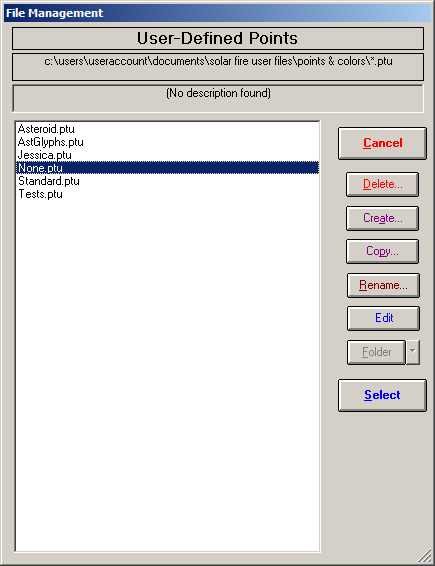
b)Select Displayed User-Defined Points. This opens the following dialog window:
 UDPs Management |
Each file you see here contains a user customized selection of points, either that you the user have made, or that came with Solar Fire. One file that comes with Solar Fire is "None.ptu", and as the name suggests this has no user defined points selected in it, so you can choose this file when you don't want any UDPs to be displayed on charts or reports.
c)To create a new selection of points ...
a)click on the Create button. You will be asked to give the new selection a file name.
b)type in a name for the new UDPs selection
c)click on the OK button. A new UDPs file will be created and added to the list, and selected (highlighted). The file will be empty (have no points selected in it yet), so you will now need to edit the file to add some points to it.
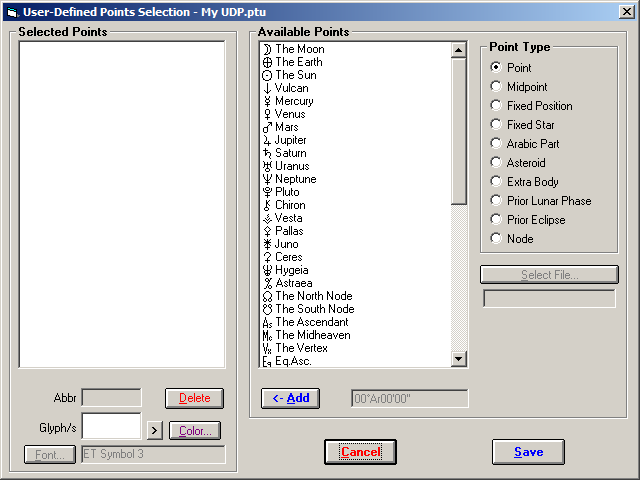
4.To edit an existing selection of points first highlight the file you want to edit (if it's not already highlighted) by clicking on the UDPs name (i.e. one of the file names in the list), then click on the Edit button. The following dialog window will open where you can select the points you want to be in this UDPs file:
 UDP Selection |
Here you can see on the right hand side the different "Point Types" available to choose points from, or from which to create points. As you select each type of point Solar Fire will populate the "Available Points" list box with points of that type that you can select. (For additional info see below *)
a)to select an available point click on it
b)to select several available points all adjacent to (next to) each other click on the first of these points, then press the Shift key on the keyboard and hold it down, then click on the last point in the list that you want, then release the Shift key
c)to select several available points that are not adjacent but scattered throughout the list, press the Control key on the keyboard and hold it down, then click on each point you want to select (to unselect a point just click on it again), then when finished selecting points release the Control key
d)finally, with those specific available points that you want selected, click on the <– Add button, and these points will be added to the "Selected Points" list box. These points in the "Selected Points" list box are now "turned on" in your UDPs file
e)to remove a point from the "Selected Points" list box click on it to highlight it, then click on the Delete button. You can only delete one point at a time.
5.To create a completely new point not pre-supplied by Solar Fire:
a)click on the "Point Type" Fixed Position. This point will not be a point that moves over time, it will always be at the same position in the Zodiac.
b)enter in a Zodiac position (sign degree, minute and second) in the text box to the right of the "<– Add" button
c)click on the <– Add button, and the zodiac point you entered will be added to the "Selected Points" list box.
6.To alter the appearance of any UDPs in charts and reports you can click on any point in the "Selected Points" list box to highlight it, and:
a)replace the default text abbreviation that Solar Fire provided for the point, by typing over it in the "Abbr" text box with your own abbreviation
b)replace the default glyph(s) that Solar Fire provided for the point, by typing over it(them) with your own glyph(s), or ...
▪click on the > button to the right of the "Glyph/s" text box which displays the Character Map dialog, and then
▪select the font (from which to choose a character for the glyph), from the drop down box at the top of the Character Map dialog, and then
▪select a character to use as a glyph for the point from those displayed, by clicking on the character, and then
▪in the Character Map dialog click on the Select button, and then click on the Copy button, and then
▪close the Character Map dialog by clicking on the X in the top right hand corner, and then
▪back in the "User Defined Points Selection" dialog, in the Glyph/s text box, right click the mouse and in the menu that pops up click on Paste, which will paste the character you selected.
c)change the color of the glyph by clicking on the Color button, and selecting a color
d)change the font for both the abbreviation and the glyph by clicking on the Font button and selecting a font (this also sets the default font for the Character Map when you open it, but as above you can change that once it's opened).
1.Finally click on the Save button, which will close the "User Defined Points Selection" dialog and return you to the File Management dialog.
>> To use a selection of User Defined Points
1.In the Main Screen click on Chart Options, or in the "View Chart" window right-click on any blank area
2.Click on Displayed User-Defined Points
3.Click on the UDPs file you want to use, then click on the Select button.
IMPORTANT: When a UDPs file is selected for use in the "Chart Options" dialog ... you need to be aware that this will also become the UDPs file that is selected in the "Dynamic Reports Selection" dialog in the "User" text box, and also in the "Graphic Ephemeris Selection" dialog in the "User" text box.
If you then subsequently change this setting you made via the "Chart Options" in either of those two Dynamic dialogs, that will also change it in Chart Options as well, replacing the selection you previously made there. In other words you can only have one UDPs file in use at any one time, and it can be set anywhere UDPs are displayed throughout the program, and then subsequently applies globally throughout the program.
