Time Map

Contents
>> To view a graphical display of the dynamic events in your report
•Select the Time Map button.
After a brief calculating period, the TimeMap screen will appear.
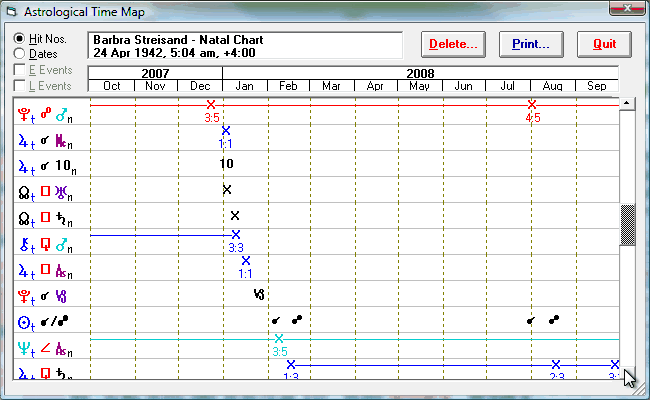
The time scale for the time map corresponds to the period of the dynamic report upon which it is based. The list of dynamic events is the same as those in the dynamic report, expect that all the Entering, Exact and Leaving events of a particular transit or progression are grouped together into single entries. Also, to optimize space, the events are listed using astrological glyphs, using subscripts to indicate what kind of dynamic event they relate to. These subscripts are
t - transiting
p - progressing
d - directed
n - natal
r - radix
It is possible to alter the display to show either transiting hit numbers or dates/times on which certain events occurred, on the map. The Hit Nos option shows which hit in a series of direct/retrograde transits to a point is occurring. For example, if the transit has three hits (1st hit direct, 2nd hit retrograde, and 3rd hit direct), then these events will be labeled 1:3, 2:3, and 3:3 respectively. If the transit has only one hit, then it will be labeled 1:1. This enables you to see at a glance whether there are associated hits which occur before or after the duration of the time map. Note, however, that progressions and directions and special dynamic events do not have hit numbers shown, as these will generally always be single events. The Date option shows the day and month of each major event on the map. For example an event which occurs on the 23rd March will be labeled either 23/3 or 3/23 depending on the date order in your Windows setup. However, if the duration of the time map is less than 7 days, then this option shows the time in 24 hour format, instead of the date. For example an event which occurs at 3:46pm is labeled 15:46. It is possible to scroll through this list by using the scroll bars on the right of the screen. It is also possible to reorder and delete lines in the map.
>> To delete one or more lines from the map
1.Select the required lines by clicking on them
2.Select the Delete button
You will be asked to confirm whether or not you wish to delete them. Note that clicking on any line selects it on the first click, and un-selects it on a subsequent click.
>> To move a line on the map
1.Drag and drop the required line as follows
2.Position the mouse over the line you wish to move and hold down the left hand button
3.Drag the mouse to the required position in the map
4.Release the mouse button
>> To print a copy of the time map
1.Optionally use the Printer button to alter printer settings such as paper orientation
2.Select the Print button
This will print the entire list, in the displayed order, using as many pages as are required. Each page will have a time scale printed at the top.
>> To view further information on an item
•Double click on a line.
The Item Info dialog box will be displayed, showing interpretations and event information. This may be used in the same manner as in the dynamic report screen.
>> To return to the dynamic report screen
•Select the Quit button.